Personal Finance
How to Build an Emergency Fund: A Step-by-Step Guide
Build emergency savings in practical stages: define the fund, calculate a target from essential costs, automate contributions, and set clear rules for using it.
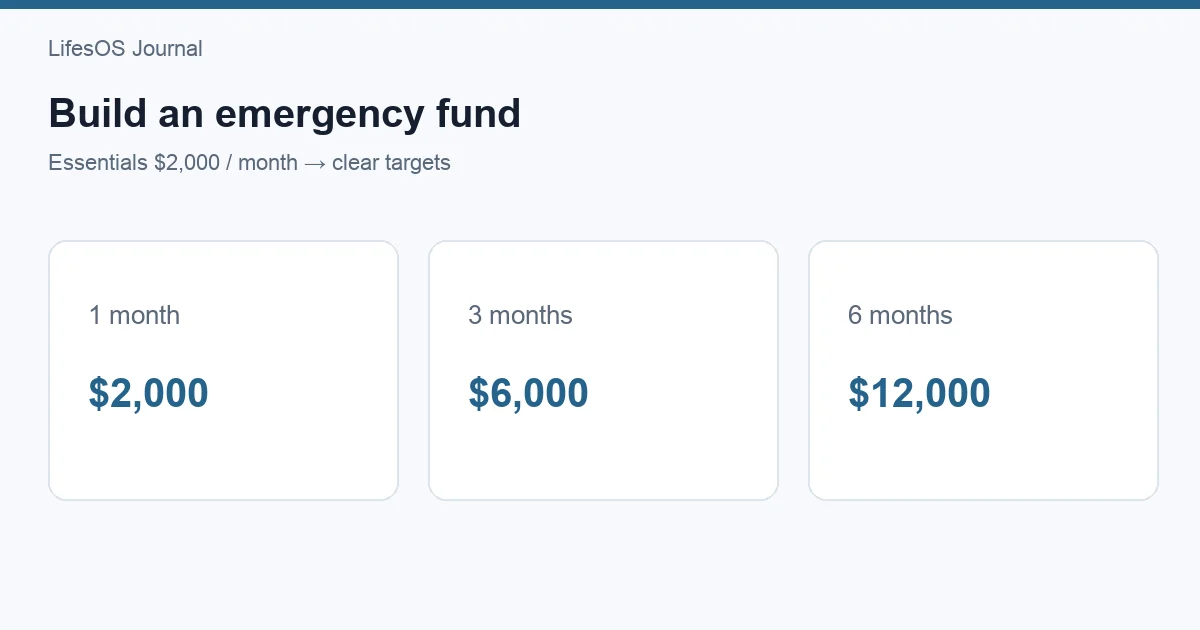
To build an emergency fund, open a separate safe savings account, choose a first milestone you can reach, and schedule an automatic transfer after every payday. Calculate your longer-term target from essential monthly expenses rather than income: one month creates a useful buffer, while three to six months can cover a longer disruption. If your essentials are $2,000 per month, those targets are $2,000, $6,000, and $12,000. Start with the next milestone—not the largest number—and increase contributions when income rises or a debt payment ends.
An emergency fund is not a test of discipline. It is a financial shock absorber. The steps below help you build one on a limited or variable income, decide where it belongs, know when a withdrawal is justified, and restore the balance afterward.
What an emergency fund is—and is not
An emergency fund is cash reserved for urgent, necessary, and unplanned expenses or income loss. A broken furnace in winter, an essential car repair, emergency medical travel, or a job interruption may qualify. A holiday, annual insurance bill, routine vehicle service, or known tuition payment does not; those predictable costs belong in sinking funds.
The distinction protects the fund. If every inconvenient bill is called an emergency, the balance never has time to grow. Write a one-sentence rule such as: “This account covers necessary costs that were not reasonably predictable and cannot be paid from this month's cash flow.”
Why build emergency savings?
Cash creates options at the moment your normal plan stops working. It can keep an urgent cost off a credit card, let you meet minimum bills during unpaid leave, or give you time to compare repair quotes. Even a partial fund helps; it does not need to cover every possible crisis before it becomes useful.
The Consumer Financial Protection Bureau notes that the right amount depends on your situation and that even a small amount can provide financial security. The practical goal is not to eliminate risk. It is to reduce the chance that one disruption becomes expensive debt or forces a rushed decision.
How to build an emergency fund in eight steps
1. Calculate essential monthly expenses
Use a recent monthly budget and total only costs that would continue during a disruption: housing, basic utilities, groceries, required transport, insurance, medicine, childcare needed for work, and minimum debt payments. Exclude optional shopping, entertainment, travel, extra debt payments, and expenses you could pause temporarily.
| Essential category | Monthly amount |
|---|---|
| Housing | $900 |
| Utilities and phone | $200 |
| Groceries | $350 |
| Transport | $250 |
| Insurance and medicine | $180 |
| Minimum debt payments | $120 |
| Total essentials | $2,000 |
2. Choose staged targets
Do not make the six-month goal your only finish line. Use stages that deliver increasing protection.
| Stage | Calculation | Example target | What it can do |
|---|---|---|---|
| Starter buffer | One common urgent cost | $500–$1,000 | Cover a repair or deductible partly or fully |
| 1 month | $2,000 × 1 | $2,000 | Bridge a delayed paycheck |
| 3 months | $2,000 × 3 | $6,000 | Cover a moderate income interruption |
| 6 months | $2,000 × 6 | $12,000 | Create a longer runway |
For a deeper decision about the final target, read how much to keep in an emergency fund. Job stability, dependents, health needs, insurance deductibles, and access to reliable support all affect the right range.
3. Pick the right place to keep it
Prioritize safety, liquidity, low fees, and deposit protection. An insured savings account is often suitable. A competitive interest rate helps, but access and account rules matter more than chasing a small yield difference. Verify insurance eligibility, withdrawal limits, transfer time, minimum balances, and fees with the institution.
Keep the reserve separate from everyday checking so it is not mistaken for spendable cash. You can keep a small first layer at your main bank for quick access and the rest in another insured savings account. Avoid putting the core reserve in stocks or other volatile assets; a market decline may coincide with a job loss.
4. Set the first contribution deliberately
Choose an amount that can repeat through an ordinary month. If $200 is too fragile, start with $25. A smaller transfer that happens 24 times is more useful than a large transfer canceled after two paychecks. Compare your current savings rate, but treat it as information rather than a grade.
5. Automate after payday
Schedule the transfer for payday or the following day, after confirming that essential bills will clear. Employees may be able to split direct deposit between checking and savings. Freelancers can transfer a percentage of each payment, then reconcile monthly. Name the account “Emergency Reserve” and track progress toward the next stage.
Set up your emergency-fund goal in LifesOS Finance, then connect the next milestone to your budget and weekly money review.
6. Add irregular income without depending on it
Decide in advance what portion of bonuses, refunds, gifts, rebates, or sold items goes to the fund. For example, direct 50% of every windfall until the one-month target is reached. The rule prevents a new decision each time while leaving room for current needs.
7. Increase the transfer at natural moments
Raise contributions after a pay increase, debt payoff, canceled subscription, or lower insurance premium. Sending half of a $100 monthly improvement to savings increases the transfer by $50 without making the entire gain disappear. Review the amount quarterly and after major life changes.
8. Track milestones, not daily fluctuations
Checking too often can make slow progress feel discouraging. Review the balance monthly, record the percentage of the current target reached, and estimate the next milestone date. Interest is a bonus; regular contributions do most of the work.
How to start on a limited income
When cash flow is tight, the first job is finding a small repeatable margin—not cutting every enjoyable expense. Review the last 30 days and choose one realistic source:
- Reduce one flexible category by a specific amount for eight weeks.
- Cancel or pause one unused subscription.
- Move a bill due date to reduce overdraft risk.
- Sell items you no longer use and direct the proceeds to the starter target.
- Save a small fixed amount from each shift, invoice, or paycheck.
- Keep part of any month that ends below budget.
If income does not cover essentials, stabilize housing, food, utilities, transport, and minimum obligations first. Community assistance, creditor hardship programs, or qualified nonprofit credit counseling may matter more than forcing a savings transfer. Building a reserve becomes easier once monthly cash flow is not consistently negative.
Example contribution timelines
| Monthly contribution | $1,000 starter | $2,000 month | $6,000 three months |
|---|---|---|---|
| $50 | 20 months | 40 months | 120 months |
| $150 | About 7 months | About 14 months | 40 months |
| $300 | About 4 months | About 7 months | 20 months |
| $500 | 2 months | 4 months | 12 months |
These simple estimates ignore interest and withdrawals. A long timeline does not make the plan pointless. Each contribution reduces the amount a future surprise must take from current income or borrowing.
When should you use the fund?
Before withdrawing, ask three questions: Is the expense necessary? Is it urgent? Was it genuinely unplanned? A cost does not need to be dramatic to qualify, but it should satisfy the rule you wrote. A required tire replacement may qualify; discounted concert tickets do not. A known annual premium belongs in a sinking fund, even if the due date was forgotten.
Use only what the situation requires. Keep receipts or a brief note about the reason, especially in a shared household. Do not feel guilty about a legitimate withdrawal—the account is performing its assigned job.
How to rebuild after using it
- Handle the immediate problem. Do not optimize contributions during an active emergency.
- Record the new balance. Compare it with the previous milestone.
- Resume the old automatic transfer. Restart on the first stable payday.
- Add a temporary boost if affordable. Redirect a small flexible amount for a defined period.
- Learn from the event. If the cost was predictable, create a sinking fund so it does not draw from the reserve again.
If the entire fund is used, return to the starter milestone first. Rebuilding in stages gives you useful protection sooner than thinking only about the final target.
Common mistakes to avoid
- Waiting for a perfect target. Begin with a useful first milestone.
- Saving what is left at month-end. Automate a planned amount instead.
- Keeping the money in checking. Separation reduces accidental spending.
- Investing the core reserve. This money needs stable value and timely access.
- Using it for predictable costs. Give irregular bills their own funds.
- Stopping after a withdrawal. Make rebuilding part of the original policy.
FAQ
How much should I save first?
Choose one common urgent cost, such as a deductible or repair, or aim for $500 to $1,000. Then build toward one month of essential expenses and your longer-term target.
Should I build an emergency fund while paying debt?
A starter buffer can prevent the next surprise from returning to a credit card. After that, the best split depends on interest rates, minimum payments, income stability, and household risk. Consider qualified advice for your circumstances.
Can I keep emergency savings in cash at home?
A small amount may help during a short outage, but storing the full reserve at home creates theft, fire, and loss risks and earns no interest. An appropriately insured account is generally safer.
What if my income changes every month?
Transfer a percentage of each payment and set a modest minimum for lean months. Base the target on essential expenses and consider holding toward the higher end of your chosen range.
How often should I review the target?
Review it yearly and after a move, new dependent, job change, insurance change, or major shift in essential costs.
Sources
- Consumer Financial Protection Bureau: An essential guide to building an emergency fund
- Federal Deposit Insurance Corporation: Deposit insurance resources
Start with one account, one milestone, and one automatic transfer. Try LifesOS free for 7 days to connect emergency savings with your budget and see progress without maintaining another spreadsheet.
This article provides general educational information, not personalized financial, investment, tax, or legal advice. Consider your circumstances and consult a qualified professional when needed.